Jeep transfer cases are critical components of your Jeep Wrangler TJ and you should know how to service them properly. We also need to know how to work on a jeep TJ transfer case so we can do it ourselves.
This article shows the Jeep TJ Transfer Case Linkage Diagram, why do you need one, and how to adjust, remove and fix problems.
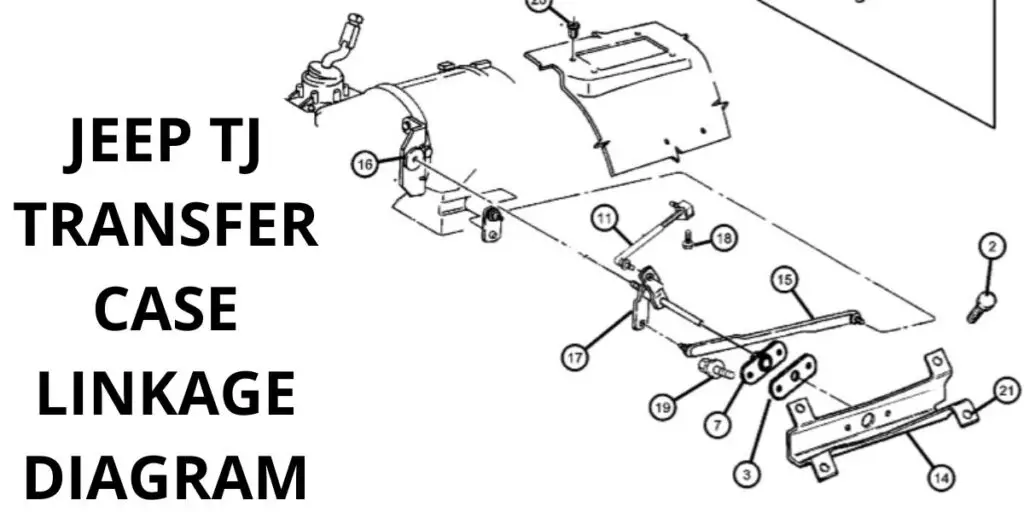
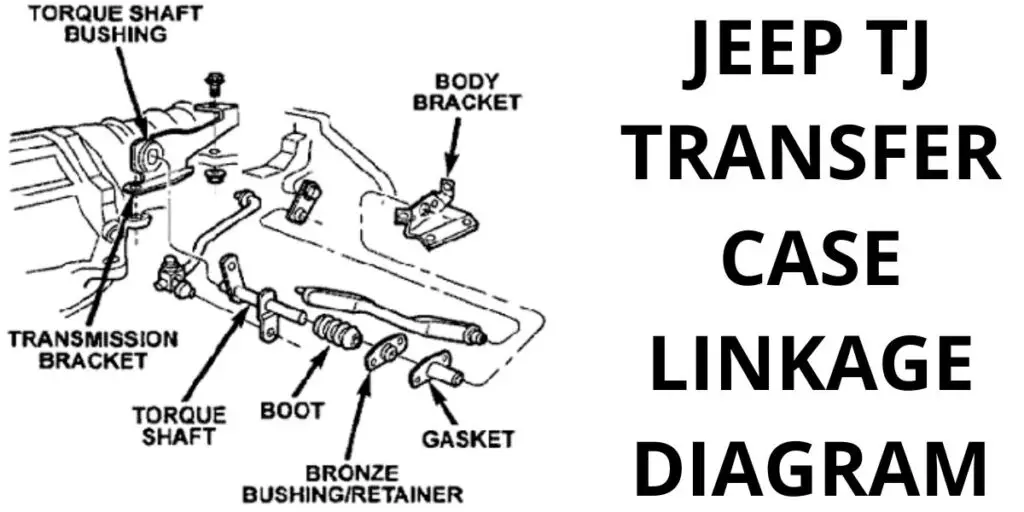
Jeep TJ Transfer Case Linkage Diagram
This is the Jeep TJ Transfer Case Linkage Diagram:
Check out this article on How to Increase Towing Capacity Jeep Wrangler.
Why do you need a Jeep TJ Transfer Case Linkage Diagram?
- A Jeep TJ Transfer Case Linkage Diagram can be helpful in understanding how the various Jeep TJ transfer case components work together.
- This diagram can also help identify any potential issues with the Jeep TJ transfer case that may need to be fixed.
- A Jeep TJ Transfer Case Linkage Diagram can be helpful in order to identify the locations and functions of the Jeep TJ transfer case components.
- If you are installing a new transfer case, you will need a linkage diagram to help you determine what bolts need to be removed and replaced.
Jeep TJ Transfer Case Linkage Adjustment
Follow these steps for Jeep TJ Transfer Case Linkage Adjustment:
- Remove the four bolts securing the transfer case to the frame (2 on the front, 2 on the back).
- Once the four bolts are removed, remove the transfer case and place it on the floor.
- Locate the transfer case linkage assembly. This can be found between the transfer case and the differential.
- Use a socket wrench to remove the two bolts that hold the transfer case linkage assembly in place.
- Remove the linkage assembly. Note: The transfer case linkage assembly will have one bolt on each side.
- Check to see if the transfer case is in the correct position. If not, make adjustments to the transfer case linkage assembly as required. Adjust the transfer case linkage assembly as required.
Best Jeep TJ Wrangler Transfer Case Shift Linkage Upgrade
The GCD Heavy Duty Jeep® TJ Wrangler Transfer Case shift linkage upgrade is the best product to go for if you want to upgrade your TJ’s transfer case shift linkage.
Jeep TJ Transfer Case Linkage Removal Process
This is how the Jeep TJ Transfer Case Linkage Removal works:
- Unscrew the bolts holding the transfer case in place.
- Remove the transfer case, as shown below.
- Slide the linkage out of the way.
- Disconnect the power steering pump from the transfer case and remove it.
- Remove the two bolts that hold the transfer case to the transmission case.
- Remove the two bolts that hold the transfer case to the differential case.
- Disconnect the drive shaft from the transfer case.
- Slide the transfer case forward.
- Remove the transfer case from the differential case.
Jeep TJ Transfer Case Linkage Bushings
If your Jeep TJ has a Transfer Case Linkage Bushings issue, you may need to replace them.
Jeep TJ Transfer Case Not Shifting Solution
If you are having trouble with your Jeep TJ Transfer Case not shifting, there are a few things you can do to troubleshoot the issue.
1. Check the fluid level in the transfer case
First, check the fluid level in the transfer case. If the fluid is low, it may be causing the Jeep TJ Transfer Case not to shift.
2. Check the transfer case alignment
If the transfer case is not aligned properly, it may also be causing the Jeep TJ Transfer Case not to shift. If the alignment is not correct, the transfer case may need to be replaced.
Conclusion
I hope you found this Jeep TJ Transfer Case Linkage Diagram useful. This diagram will help you solve & troubleshoot all problems with your Jeep TJ Transfer Case.
